Slow Cooker Thai Tofu & Lettuce Wraps from the Leftovers

I saw a recipe pop up for slow cooker Thai chicken the other day and I realized that I had all the ingredients on hand to make a vegetarian (actually vegan!) version. YAY!  It looked easy, tasty and I thought I’d give it a go. The results did not disappoint. It truly was easy and it tasted amazing. Final icing on the cake? I was able to put my leftovers to good use by making them into lettuce wraps the next night at dinner!

A couple of things of note…  I ate it before I took a picture of it. So, just take my word for it that it looks good too. Also, the 1 Tbsp of saracha in the recipe makes it pretty hot. If you don’t like spicy foods, I’d drop it down to just 1/2 Tbsp.  If you’re not a tofu fan, you can also adapt this same recipe to use a Faux Chicken product such as Quorn Chik’n Cutlets or Gardein Chick’n Scallopini.

Slow Cooker Thai Tofu

Serves 4. Recipe based off of Shrinking Kitchen

Ingredients:

  • 4 Tbsp PB2 (or 1/4 cup of peanut butter)
  • 3/4 cup light coconut milk
  • 1 Tbsp Sriracha Hot Chili Sauce (use 1/2 Tbsp if you like less heat)
  • 2 Tbsp lime juice
  • 1 Tbsp low-sodium soy sauce
  • 1 Tbsp Sugar
  • 2 Tbsp grated fresh ginger
  • 1 package extra firm Tofu, sliced in 1/2 inch slabs
  • 1/3 cup chopped peanuts, for topping
  • 4 Tbsp chopped cilantro, for topping
  • 1/2 cup bean sprouts, for topping
  • 8oz Whole wheat pasta
  • 1 cup shredded carrots

Directions:

  1. Combine PB2 or peanut butter with coconut milk in a medium bowl.
  2. Add in Sriracha (or less), lime juice, soy sauce, sugar, and ginger. Stir well to combine.
  3. Coat the tofu with the mixture and place in a slow cooker. Pour half of the remaining mixture into the slow cooker. Retain the other half in the refrigerator for use later.
  4. Cook on high for 2 1/2 – 3 hours or low for 4 – 5ish hours.
  5. Cook and drain the pasta. Heat remaining peanut sauce and carrots in the pasta pot, cooking over medium heat until well combined and carrots are slightly limp. Add the pasta back to the pot and stir well to combine.
  6. Serve tofu over the top of the pasta. Top with chopped peanuts and cilantro.


Thai Tofu Lettuce Wraps from the leftovers

Ingredients:

  • Leftover Thai Tofu (recipe above)
  • 1 cup shredded carrots
  • 1/2 can water chestnuts, finely chopped
  • 1/4 cup green onions, for topping
  • Leftover bean sprouts, for topping
  • Leftover cilantro, for topping
  • Lettuce leaves (iceburg, romaine or green leaf), washed and dried

Directions:

  1. Cut the leftover tofu into cubes. Heat over medium heat along with carrots and water chestnuts.
  2. When it’s heated through, add green onions and serve with lettuce leaves, bean sprouts and cilantro.
  3. Eat by placing a bit of the tofu mixture into the lettuce leaf, roll it into a wrap and devour!

Vegan Peanut Butter Banana Brownies

I wanted brownies, but I wanted something a little more natural and healthier. By healthier, I don’t necessarily mean “low fat” or “weight loss friendly”. Instead, I mean using natural, whole ingredients and using no animal products.

Rarely do I venture out on my own completely to make up recipes for baked goods. I realize that baking is definitely more of a science than cooking, so the chances of botching the whole thing is relatively high. But for this one, I went out on a limb and tackled making up a recipe – quite literally from scratch. This limb was worth the climb! These brownies resulted in a rich, tasty, satisfying brownie with chocolaty, peanut butter goodness and undertones of banana. So, if you’re wanting a lovely sweet treat free of refined sugars or dairy, I recommend you try this one out next time.

Vegan Peanut Butter Banana Brownies

Ingredients

  • 2 Bananas, very ripe, mashed
  • 1/2 c coconut oil
  • 1/2 c honey or brown rice syrup
  • 2 t vanilla
  • 1/4 c + 2 Tbsp almond milk, unsweetened
  • 1 1/2 c whole wheat pastry flour
  • 1/2 c peanut flour (or PB2)
  • 2/3 c cocoa powder (dutch processed preferred)
  • 2 t baking powder

Directions

  1. Heat oven to 350 F. Spray an 8×8 or 9×9 pan with non-stick cooking spray.
  2. Combine all wet ingredients together (banana, coconut oil, honey/brown rice syrup, vanilla, almond milk) in a large bowl. Whisk or sift together all dry ingredients (wheat flour, peanut flour, cocoa powder, baking powder).
  3. Add dry ingredients to wet and stir until combined. Spread batter into your pan.
  4. Bake 20-25 mins. Watch it carefully to insure it does not over-bake and become dry.
  5. Allow it to cool in the pan before slicing into 12 pieces.

Nutrition (approx): 225 cal, 11g fat, 31g carb, 4g fiber, 5g protein

Quick Quinoa Kale Bowl

Quinoa Kale

I call this my “power meal”! It’s an all-in-one meal and a power house of healthy ingredients, quinoa, kale, avocado. It’s high in protein, low in bad fats, high in good fats and straight up FILLING and DELICIOUS. Oh, and to make it even better… It’s super quick and easy!

I usually keep all the ingredients on hand and make more than I need and eat this for dinners and lunches for a few days. It’s my new favorite meal!

Here’s how I do it:

Quick (15 min) Quinoa Kale Bowl

Serves 2

  • 2 cups kale, cleaned & coarsely chopped
  • 2/3 cup cooked black beans, rinsed & drained
  • 2/3 cup quinoa, cooked according to directions on the package (any color will work, I usually use red)
  • 2/3 cup pre-made fresh pico de gallo
  • 1/2 cup lowfat mozzarella cheese, shredded
  • 1/2 avocado, cut into cubes
  • Sea or kosher salt to taste
  1. Make the quinoa according to packaged directions. Heat your beans (on the stove or in the microwave for 1-2 minutes). Steam the quinoa (in a steamer or 2 minutes in the microwave, covered)
  2. Divide all ingredients except avocado and salt into two bowls and stir until just combined. Season to taste, top with fresh avocado, and serve.

Nutrition (approx): 300 cal, 7g fat, 43 carb, 9 fiber, 16g protein

Sugar & Spice and Carrotly Nice Cupcakes

20100710_carrotcupcakes-2

My sister is having a baby. Yay. You know what that means…  A party…. And Cupcakes!  And I received the honor of making those cupcakes for her baby shower. That’s a job I won’t pass up!

It was an ‘eco’ or ‘green’ themed shower with lots of earthy tones, earthy foods, etc. So, I couldn’t think of a better cupcake to make than a whole wheat carrot.  Whole wheat? Healthy! Carrots? Healthy! A healthy cupcake! (ehem)

After a few attempts, I finally found  recipe that was perfection. It’s from the King Flour Whole Grain Baking book. My all-time favorite book – but you know that – I talk about it all the time… It’s a lightly spiced, not too sweet but just sweet enough carrot cake. It’s super moist and light. The texture was amazing. And then of course I had to take it up to more gourmet and ‘healthier’ heights (wink, wink) by filling it with caramel and orange scented cream cheese. Once assembled, the carrot cake was the perfect flavor to mesh with the caramely, cream cheesy filling goodness.

20100710_carrotcupcakes-3

20100710_carrotcupcakes-4

Along with the green theme, I decided to make them like little grassy pots with an abstract flower and leaf on the top. I used all natural baking cups and a grass tip for the frosting and I colored and cut Satin Ice Fondant for my toppers. The flowers were two rounds stacked and glued with a drop of royal icing. How did I make the leaves curve,  you ask? Press them down over a couple of parallel chopsticks!

20100710_carrotcupcakes-5

Oh, and she’s having a girl. Thus the name… “Sugar & Spice and Carrotly Nice Cupcakes”. Enjoy!

20100710_carrotcupcakes-1

A Cupcake CoThese Cupcakes are available at A Cupcake Co.


5min Gourmet: Eggs Florentine

5 Minute Gourmet: Eggs Florentine

I was telling a friend the other day about a single-serving Eggs Florentine I made for myself for breakfast earlier that morning. She asked me how I found time to make something like that for breakfast on a work day. It DID sound quite fancy for a work day, if you think about it, doesn’t it? I paused for a second, realizing that my method was quite simple and time effective. It just SOUNDED gourmet. I considered letting everyone think I was a gourmet chef every day of my life, but alas, that’s not the case. So, I decided to share my secret and the truth is it only took about 5 minutes to make.

As an added bonus, this morning ‘fine dining’ has the benefit of being a hearty way to begin a day with high protein, whole grains, veggies and is satisfying to the tongue. Plus, using the nonfat dairy, it’s lower fat than traditional Eggs Florentine. A healthy breakfast is always key to a good day, right? And in just 5 minutes? How can you say no?

But of course, I can’t just let it rest there. I had to put my theory to the test with stopwatch & camera*   in hand. Here are the results… (*Disclaimer: Taking pictures while on the clock does not turn out so well, but you get the idea)

5 Minute Gourmet

Lowfat Eggs Florentine with Creamy Parmesan Garlic Sauce

  • 1 egg
  • 1 slice wheat bread (I used 2 small slices of Judy’s Breadsticks – Vegan with sunflower seeds)
  • Spinach (small handful)
  • Tomato (a couple of slices)
  • Parmesan cheese (approx 1 tea)
  • Fat Free milk (approx 1 Tbsp)
  • Fat Free cream cheese (approx 1 tea)
  • Minced garlic or garlic paste (approx 1/4 tea)

Ready….?  GO!

0:00

Fill pan with 1 inch water. Place on stove over high heat

0:15

Pull out all ingredients: Egg, bread, spinach, tomato, parmesan cheese, milk, cream cheese, garlic.

Pull out utensils and tools: Sharp knife, spoon, fork, cutting board, plate, small microwave safe bowl.

5 Minute Gourmet: Eggs Florentine

0:55

Place the bread on your plate. Throw a handful of spinach over the top. Microwave for 20 seconds.

Slice the tomatoes while the bread is in microwave. Place the tomatoes on top of the spinach.

5 Minute Gourmet: Eggs Florentine

2:11

Drop egg in the now boiling water. Turn heat down to medium-high. Let it cook for approx 2 mins.

2:15

Put parmesan, milk, cream cheese and garlic in small bowl. Stir lightly.

2:55

Microwave for 20 seconds. Stir.

4:15

Remove egg from pan and place on top of the spinach. Drizzle sauce over the top.

4:58

Done. Now, go eat! 🙂

5 Minute Gourmet: Eggs Florentine

Nutrition: 150 cal, 6g fat, 14g carb, 2.5g fiber, 3g sugars, 11g protein

Chewy Trail Mix Granola Bars

20100923_granolabar-1

I’m a huge fan of Kashi TLC Granola Bars. My husband and I buy them in bulk at Costco for quick grab-n-go snacks. I know that granola bars really aren’t that difficult to make. The problem was I’d never found a recipe I really liked. They usually ended up being too crunchy (I like chewy bars), too dense, too high fat, or too – I don’t know – Just “too”!

Until I found a couple of key ingredients that has helped me turn the corner in the elusive perfect granola bar recipe – Peanut Flour (aka PB2) and Brown Rice Syrup.  The peanut flour helps keep them together and adds a lovely protein punch and the brown rice syrup is thick and sticky enough to keep them chewy.

They are still “too”. This time, they’re “too good” and I can’t stop eating them. 🙂

I love these and I hope you do “too”… Have fun playing with the ingredients. The base recipe works, so whatever you want to toss in to your own preference, have at it!

Chewy Trail Mix Granola Bars

Makes 8 bars

  • 1 cup oats
  • 1 cup high fiber cereal (Trader Joe’s or Fiber One) OR 1 cup of unsweetened, whole grain cereal of your choice
  • 1/4 cup brown rice syrup
  • 2 Tbsp agave nectar
  • 1 t olive oil
  • 1/4 cup lowfat peanut flour or PB2
  • 1/4 t kosher or sea salt
  • 1/4 cup sliced almonds
  • 1/4 cup dried cranberries (or other dried fruits)
  • 1/8 cup mini dark chocolate chips (optional)
  1. Preheat oven to 375 F. Generously spray a 9×5 loaf pan with nonstick spray.
  2. Spread oats and almonds over a baking sheet.  Bake for 10-15 mins, stirring once midway through. When the almonds have turned slightly darker and are fragrant, remove from oven.
  3. While oats and almonds are baking, combine brown rice syrup, agave nectar, olive oil, peanut flour and sea salt in a large bowl.
  4. Remove oats and almonds. Turn oven down to 300 F
  5. Place hot oats and almonds in the syrup bowl, add fiber cereal and cranberries stirring until completely coated.  Pour mixture into loaf pan.
  6. Using the back of a spoon that has been lightly sprayed with nonstick spray, lightly press the mixture into the pan until the top is smooth and the mixture is slightly compressed. Do not press down too much or your bars will be to dense, but if you don’t compress them slightly, they will fall apart. Sprinkle mini chocolate chips over the top.
  7. Bake for 20 mins. Remove from oven and let cool for approx 20 mins. Slide a knife around the edges of the pan and very gently (so as not to lose all your chocolate chips) invert the pan onto your hand or cutting board. Slice into 8 even bars.

Nutrition: 140 cal, 3g fat, 27g carb, 5.5g fiber, 4g protein

Cran Apple Bran Muffins (Faux VitaTop Muffin Copycat)

I have developed a love for the lowfat, low calorie muffin tops that are the Vitalicious VitaTop Muffin Tops. However, I DON’T love the exorbitant amount of money these little morsels cost. So, I set out to make my own.  My two favorite flavors are Deep Chocolate and Cranberry Apple Bran.  I think I have successfully found recipes that copy both (chocolate one to come at a later time).  After finding a nice base recipe for a Cranberry Apple Bran recipe (full fat), I started tweaking (while enduring some pretty dry/flat versions) until I got a lowfat/low cal version of it that I’m happy with. And here I am to share my results with you.

Plus, like the VitaTops, these are right around 95 calories each with just 0.4 g fat and about 2.2g fiber. (i.e, good for you!). The full nutrition stats are at the bottom of the post for all of you out there who want the deets.

These muffins are GOOD. So good I can’t wait for them to cool down after they come out of the oven and generally end up burning my tongue off on the super hot apples inside. Worth the burn.

Cran Apple Bran Muffins

Makes 18 muffins. (faux vitatop muffin copycat recipe)

  • 1 c wheat bran
  • 3/4 c skim milk
  • 1 1/4 c wheat flour
  • 1 1/2 t baking powder
  • 1/4 t baking soda
  • 1/4 t salt
  • 1 1/2 t cinnamon
  • 1/4 t nutmeg
  • 1/4 c brown sugar
  • 1/2 c splenda
  • 1/3 c applesauce, unsweetened
  • 1/4 c nonfat egg substitute (or egg whites)
  • 1 Tbsp vinegar
  • 1 1/2 chopped, peeled apples
  • 1/3 c Craisins
  1. Pre-heat oven to 400 degrees. Lightly coat a 18 cups of 2 muffin tins with nonstick spray.
  2. Combine wheat bran and milk. Let rest 5 minutes.
  3. Meanwhile, whisk together flour, baking powder, baking soda, salt, cinnamon, and nutmeg in a large bowl.
  4. In a separate bowl, combine brown sugar, splenda, applesauce, egg and vinegar.
  5. Add wheat bran and milk mixture and wet ingredient mixture to the dry mix and stir until just combined (do not over mix)
  6. Stir in apples and Craisins (or reserve Craisins to sprinkle over the top if you wish).
  7. Divide batter evenly between 18 muffin cups. Bake 12-15 mins, until a toothpick comes out clean.
  8. Devour!

Nutrition: 95 calories. 0.4g fat. 20.7g carb. 2.2g fiber. 2.2g protein.

Muffin Mania

I have been delaying posting these recipes waiting to take some pictures, but my life is crazy right now so I unfortunately haven’t been able to get to it.  In the meantime, I don’t want to keep these AH-MAZ-ING recipes from you, my loyal readers, any longer. These are both really really delicious, almost non-fat (traces of fat from fruits & egg substitute) and right around 100 cals each. How can you go wrong?

Wheat Bran Banana Muffins

  • 4 Bananas, very ripe
  • 1/2 c unsweetened applesauce
  • 1/3 c brown sugar
  • 1/3 c splenda
  • 1/3 c egg substitute (or egg whites)
  • 3/5 c skim milk, soured with 1 Tbsp white vinegar
  • 2 c whole wheat flour
  • 1 c wheat bran
  • 1 tsp baking powder
  • 3/4 tsp baking soda
  • 1/2 tsp salt
  • 1/2 cup mini chocolate chips (approx)
  1. Preheat oven to 375. Spray muffin tin with non-stick spray.
  2. In a large bowl, mash bananas. To bananas, add applesauce, sugar, splenda, egg whites, skim milk with vinegar added to it.
  3. In a separate bowl, mix flour, bran, baking soda, baking powder, and salt.
  4. Add dry ingredients to wet, and stir until just combined. Do not over beat.
  5. Divide evenly between 18-24 muffin cups, sprinkle with about 5 chocolate chips each muffin, and bake for 18-22 minutes, until lightly browned and knife inserted comes out clean. Cool on a wire rack.

Mango Coconut Muffins

  • 2 c whole wheat flour
  • 1/4 c sugar
  • 3/4 c splenda
  • 2 tsp baking soda
  • 1/2 tsp salt
  • 3/4 c egg substitute
  • 1/2 c unsweetened applesauce
  • 1/4 c skim milk
  • 1 Tbsp vinegar
  • 2 tsp coconut flavoring
  • 2 cups diced mango (about 3 mangos)
  • 1 medium banana, mashed
  1. Preheat oven to 350. Generously spray muffin tins with cooking spray (these tend to stick a bit)
  2. In a large bowl, combine the first 5 ingredients (dry ingredients).
  3. In a separate bowl, combine the remaining ingredients except the mango and banana.
  4. Add the wet ingredients to the dry and mix until just moistened.
  5. Stir in mango and banana. Bake for 20 minutes until a toothpick comes out clean.

“THE” Lemon-Raspberry Cake with Lemon Buttercream Frosting

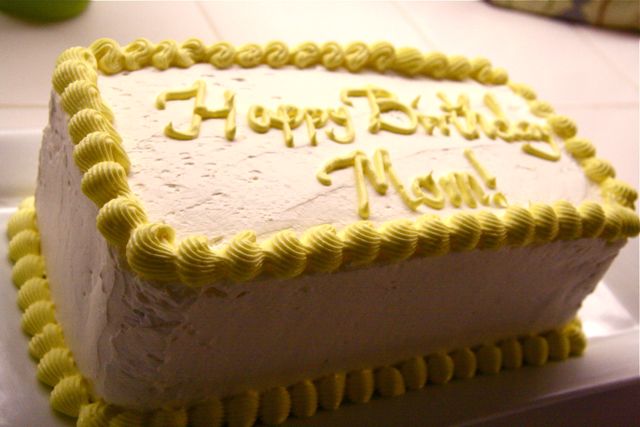
My mom has had the King Arthur Whole Grain Baking Cookbook for a year. This entire last year, she, my sister and I have been absolutely drooling over the cake picture on the cover.  Mom gave me my own copy of the cookbook (after she got sick of me always calling her for recipes out of it, I think).

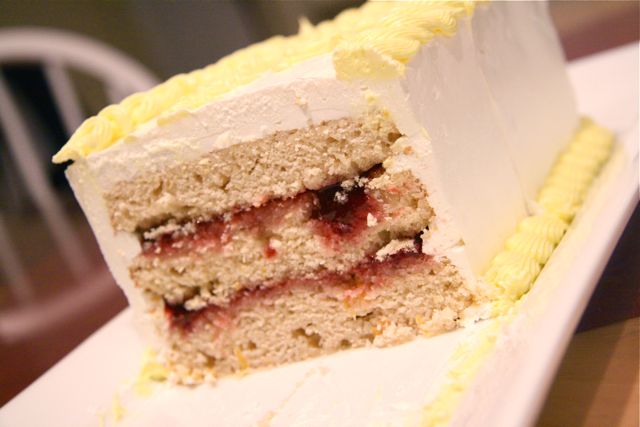
A year of drool finally caught up to us and I decided to pull out the book and make it for her as a surprise for her birthday. It came out so deliciously. It uses about half whole wheat pastry flour and the other half white all-purpose flour. Using the wheat pastry flour makes it a bit denser and not quite as ‘fluffy’ as a traditional cake, but it didn’t take away from the flavor. And with the raspberry filling and creamy frosting, it all blended oh so well together. I promised a few friends I’d share the recipe.

So, here it is in all it’s glory. Please excuse the not so spectacular frosting and decorating job by me. I’m many things but cake decorator is one I’m not. It tasted good though, I promise!

Note, while the cake is pretty simple to make, the frosting is a bit more time-consuming. Well… Actually a LOT more time consuming. I think it took me a total of about 2-3 hours to make and frost the cake. But it was worth it!  And the only thing that bummed me out was that by the time I got to the frosting step, I was so tired, I forgot to put frosting between the layers. Oh well. Still tasted good. heh.

Lemon-Raspberry Cake

Makes three 8″ or two 9″ rounds or one 9×13″ sheet cake. Serves 16

  • 2 1/4 c whole wheat pastry flour
  • 1 c unbleached all-purpose flour
  • 1 1/2 t baking powder
  • 1/4 t baking soda
  • 1 c (2 sticks) unsalted butter
  • 1 3/4 c sugar (either superfine or granulated)
  • 3/4 t salt
  • 5 large egg whites
  • 1 t vanilla extract
  • 2 Tbsp lemon zest
  • 1/4 c fresh lemon juice
  • 3/4 c milk
  • 1/4 c seedless raspberry jam
  • Fresh raspberries for garnish (optional)
  1. Preheat oven to 350. Grease and flour the pans or line the bottom with parchment paper
  2. Whisk together flours, baking powder and baking soda in a medium bowl. Cream together butter, sugar and alt in a large mixing bowl until light and fluffy, scraping down the sides occasionally. It should take at least 5 mins and the butter turns from yellow to white.
  3. Add the egg whites one at a time, beating well after each addition and scraping the bowl as needed. Beat in the vanilla and lemon zest.
  4. Mix half the flour mixture at a slow speed, then add the lemon juice and milk. Add the remaining flour mixture and mix until completely combined. Scrape sides again and mix until completely combined, being careful not to over-beat.
  5. Pour batter evenly into the pans. Level the top of the batter with a spatula or back of a spoon. Bake the cakes the amount appropriate for the size: 8″ rounds = 20-22 mins; 9″ rounds = 27-30 mins; 9×13″ sheet cake = 35-38 mins. The cake is one when it begins to pull back from the edges of the pan and is an even golden brown color on the top. The center won’t spring back when done, but neither will it leave a dent.
  6. Remove from oven and let cool on a rack 20 mins before removing the layers from the pans. Chill the cakes before assembling to make them easier to handle.
  7. To assemble, once the cakes are chilled, spread the tops of the cake layers with raspberry jam. Return the layers to the freezer for about 15-20 mins before filling with frosting and stacking layers. This allows the jam to set and the layers won’t slide apart while you’re frosting the cake.
  8. Use the lemon buttercream frosting recipe below to spread a thin layer of frosting over the raspberry jam, stack the layers and frost the outside of the cake. Keep refrigerated until you’re ready to use the cake, then take it out of the refrigerator a couple of hours in advance and serve at room temperature, if possible.

Lemon Buttercream Frosting

  • 1/2 c egg whites (whites from 3-4 large eggs) or 1/4 c meringue powder dissolved in 1/2 c cool water
  • 1/4 c light corn syrup
  • 1 c sugar
  • 1/4 c water
  • 1/2 t cream of tartar (if using egg whites)
  • 1/2 t salt
  • 1 c (2 sticks) unsalted butter, at room temperature
  • 1/2 c vegetable shortening
  • 2 t vanilla extract
  • 4 Tbsp lemon juice (divided into 2 Tbsp each)
  • 2 Tbsp lemon zest
  1. Place corn syrup, sugar, water and 2 Tbsp lemon juice in a medium saucepan. Stir until combined and the sugar is dissolved. Cover the pan and bring to a boil. Boil for 3 minutes with the pan covered to wash off any sugar crystals on the sides. Uncover and cook to the soft ball stage (240 F)
  2. Place egg whites (or reconstituted meringue powder) in the bowl of an upright mixer (such as a kitchen aid). Beat on a low speed until foamy. Add the cream of tartar (if using egg whites) and salt. Gradually increase the speed and continue beating until soft peaks form.
  3. As soon as the sugar reaches soft ball stage, remove from heat. Turn off the mixture. Very carefully, pour about 1/4 of the hot syrup down the inside of the mixing bowl. Turn the mixer on high speed and beat well. Add the syrup in two more additions, stopping the mixer every time so the hot syrup doesn’t splash and burn you, working as quickly as possible. If the sugar is slightly overcooked and hardens a bit, return it to the heat for a moment to remelt it.
  4. Continue to beat the meringue until it cools to room temperature. This takes about 20 mins of continuous beating. If you need to hurry it along, place the bowl in an ice bath for a few moments while mixing by hand then return it to the machine. If you add the butter before the meringue is cool, the butter will melt and the frosting will collapse.
  5. When meringue is cool, if you have two mixers, mix the butter and shortening together before adding it. Otherwise, beat in the soft butter a bit at a time. If the frosting starts to separate, continue beating without adding any more butter until it looks fluffy again. Beat in the shortening. Beat in the vanilla, remaining 2 Tbsp lemon juice and 1 Tbsp lemon zest.  If the frosting is too soft, refrigerate before using.

(PS – Happy Birthday, mom!)

Nonfat Whole Wheat Carrot Craisin Muffins

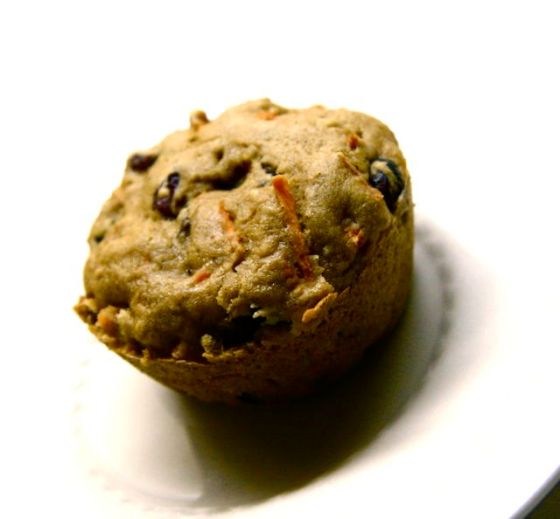
This amazing little muffin is surprisingly moist and light in texture for being nonfat and whole wheat! Even my husband (who doesn’t usually go for muffins all that often) loves these. I found a random recipe online and did a bunch of “doctoring” until I made it my own lightweight version of the muffin. It’s lovely. I highly recommend you go try it asap. And go check out the nutrition stats at the bottom. Shocked? Yep. I was too. Those little numbers (pun intended) make me very happy. 🙂

Nonfat Whole Wheat Carrot Craisin Muffins

Prep time: 15 mins
Bake time: 18-20 mins
Makes 12 muffins

  • 1 1/4 c white whole wheat flour (or whole wheat)
  • 1 t baking powder
  • 1/2 t baking soda
  • 1/2 t salt
  • 1 t cinnamon
  • 1/4 t ginger
  • 1/2 c brown sugar, packed
  • 1/2 c unsweetened applesauce
  • 1/4 c light orange juice (Trop50)
  • 1/4 c egg substitute (Egg Beaters)
  • 1 1/2 c grated carrots
  • 1/2 c dry, sweetened cranberries (Craisins)
  1. Pre-heat oven to 375 F. Spray a 12 cup muffin tin lightly with nonstick cooking spray.
  2. Sift (or mix with a whisk) the flour, baking powder, baking soda, salt, cinnamon and ginger together in a bowl.
  3. In a separate bowl, combine the brown sugar, applesauce, orange juice, and egg beaters together.
  4. Add your dry ingredients to the wet ingredients and mix until almost combined. Fold in the carrots and cranberries. (do not over beat!)
  5. Divide the batter evenly in 12 muffin cups. Reduce the oven temperature to 360 and bake for 18-20 mins until a toothpick inserted into the center of the muffin comes out clean.
  6. Let cool 5 mins in the pan, then carefully transfer the muffins to a wire rack to continue cooling.  (Letting them cool out of the pan allows the edges to not become soggy.)

Nutrition: 105 calories, 0g fat, 25g carbs, 2g protein, 2g fiber